CLI Reference
Complete reference for the Aegis Stack command-line interface.
Global Options
These options work with all commands and must be specified before the command name.
Usage:
Available Options:
--verbose, -v- Enable verbose output (show detailed file operations)--help- Show help message
Examples:
# Correct: Global flag before command
aegis --verbose init my-project
aegis --verbose add scheduler
aegis -v remove worker

# Incorrect: Global flag after command (will fail)
aegis init my-project --verbose  ❌
What --verbose Shows: - Detailed file operation logs - Template rendering details - Component resolution steps - Dependency installation progress
Quick Start Commands
aegis version
Show the Aegis Stack CLI version.
Usage:
Example Output:
aegis components
List available components with their status and dependencies.
Usage:
Example Output:
CORE COMPONENTS
========================================
  backend      - FastAPI backend server (always included)
  frontend     - Flet frontend interface (always included)

INFRASTRUCTURE COMPONENTS
========================================
  worker       - Background task processing (arq, Dramatiq, or TaskIQ)
               Requires: redis
  scheduler    - Scheduled task execution infrastructure
  database     - Database with SQLModel ORM (SQLite or PostgreSQL)
  redis        - Redis cache and message broker
  ingress      - Traefik reverse proxy and load balancer
               Recommends: backend
  observability - Logfire observability, tracing, and metrics

FRONTEND COMPONENTS
========================================
  htmx         - Server-rendered htmx web frontend
aegis services
List available services with their required components.
Usage:
Example Output:
AVAILABLE SERVICES
========================================

Authentication Services
----------------------------------------
  auth         - User authentication and authorization with JWT tokens
               Requires components: backend, database

AI & Machine Learning Services
----------------------------------------
  ai           - AI platform: multi-provider chat, agents, and an LLM catalog
               Requires components: backend
               Supports: OpenAI, Anthropic, Google, Groq, Mistral, Cohere
aegis blueprints
List available blueprints: preset component and service selections you can start a project from.
Usage:
Example Output:
AVAILABLE BLUEPRINTS
========================================

  finance  Personal finance
      Track accounts, budgets, and goals, with a local AI analyst that narrates what changed.
      Includes: worker, scheduler, database, ai, finance

Start a project from one:
   aegis init my-app --blueprint <name>
A blueprint only pre-fills the answers aegis init would ask for, so the stack it produces is identical to selecting those options by hand. Add whatever it leaves out afterwards with aegis add and aegis add-service.
Project Management Commands
aegis init
Create a new Aegis Stack project with your chosen components and services.
Usage:
Arguments:
PROJECT_NAME- Name of the new project to create (required)
Options:
--components, -c TEXT- Comma-separated list of components--services, -s TEXT- Comma-separated list of services--blueprint, -b TEXT- Start from a named blueprint, a preset component and service selection (seeaegis blueprints). Interactively this opens the guided review with the stack already resolved; with--no-interactiveit expands directly. Explicit--components/--serviceswin where given.--interactive / --no-interactive, -i / -ni- Use interactive selection (default: interactive)--guided / --quick- Interactive style: the full-screen guided setup (default) or the classic one-line prompts (--quick). Guided needs a real terminal of at least 60x20; anything else falls back to quick prompts automatically.--force, -f- Overwrite existing directory if it exists--output-dir, -o PATH- Directory to create the project in (default: current directory)--yes, -y- Skip confirmation prompt
Examples:
# Simple API project (full-screen guided setup)
aegis init my-api

# Personal finance stack from the blueprint
aegis init money --blueprint finance

# Classic one-line prompts instead
aegis init my-api --quick

# Background processing with scheduler
aegis init task-processor --components scheduler

# User authentication system
aegis init user-app --services auth --components database

# AI chatbot application
aegis init chatbot --services ai

# Full stack with auth and AI
aegis init full-app --services auth,ai --components database,scheduler

# Non-interactive with custom location
aegis init my-app --services auth --components database --no-interactive --output-dir /projects --yes
The guided setup:
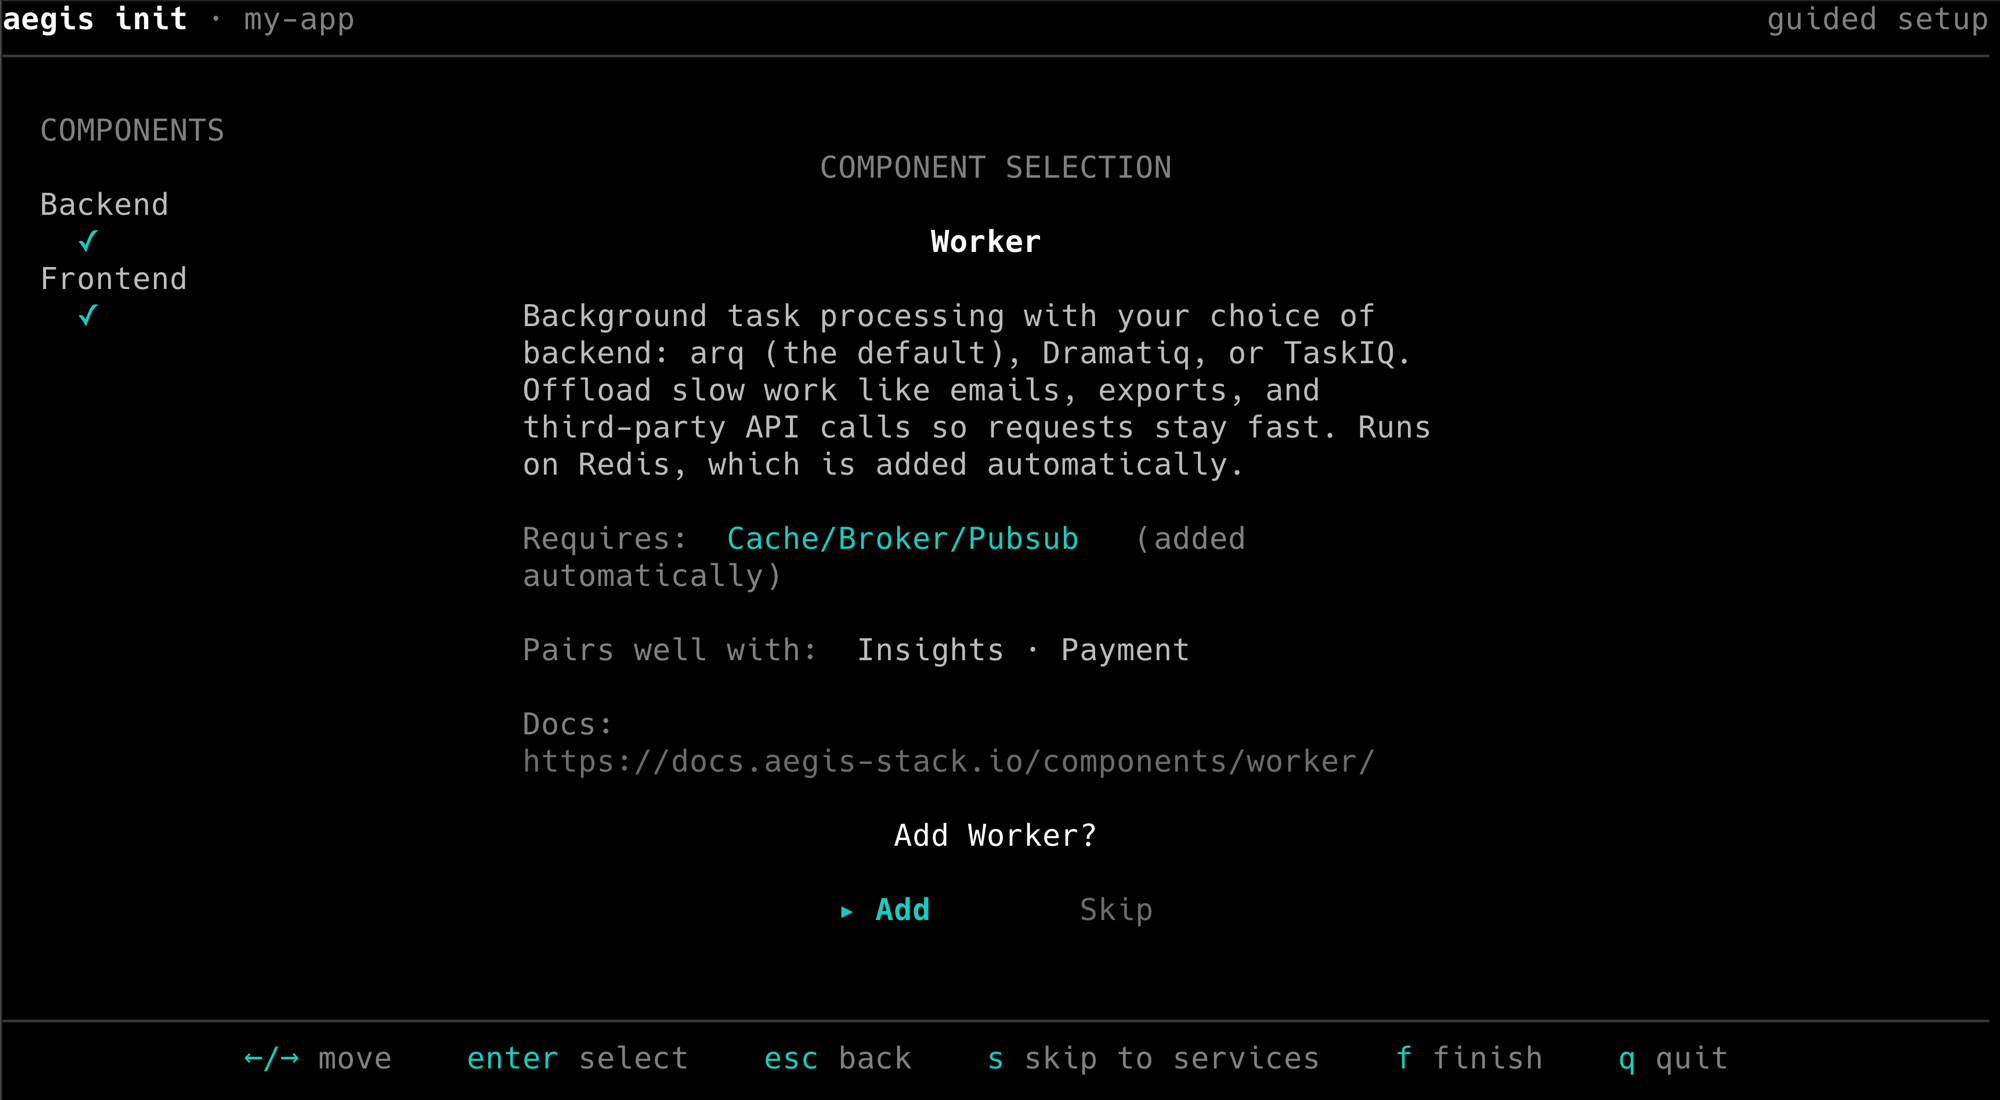
Running aegis init my-app in a normal terminal opens a full-screen guided setup: one page per component and service, each with a short explanation, its hard requirements, what it pairs well with, and a link to its documentation page. A sidebar tracks your selections as you go.
The flow is welcome page, a starting-point screen (blank canvas, or pick from the blueprint gallery), the preselected foundation (backend + frontend), one question per building block, a review screen showing the resolved plan (with file and dependency detail panes), then the build itself with live progress and a closing summary that includes a copyable one-liner to recreate the same stack anywhere.
Blueprints:
A blueprint is a ready-made stack. Choosing one on the starting-point screen opens the gallery, where each entry shows what it contains; picking it answers every question for you (components, services, and the value decisions, journaled just like keypresses) and takes you straight to the review screen with the whole resolved plan. One enter builds it. The pages that orient someone assembling a stack by hand, the foundation summary and the selections sidebar, are skipped: there are no answers of your own to keep track of.
Blueprints are starting points, not locked paths. Anything a blueprint leaves out is added afterwards with aegis add and aegis add-service, which is the same way every project grows. esc on the review undoes the one decision you actually made and returns you to the starting point, so you can choose a different blueprint or take the blank canvas and answer the questions yourself.
Run aegis blueprints to see the roster, or name one directly with aegis init my-app --blueprint finance.
Keys:
←/→move,enterselectescgo back one question (your previous answer is re-asked; every downstream effect is recomputed)sskip the remaining component questions and jump to servicesffinish: keep what you have picked so far and go straight to reviewqquit- On the review screen:
fshows the files to be created,dthe dependencies,enterbuilds - On checklist screens (AI providers):
enter/spacetoggle an entry, pickContinueto move on
Selections follow the same rules as every other mode: accepting worker pulls in redis (and skips the redis question), a persistent scheduler backend or AI conversation storage brings the database with it, and one database engine serves the whole project.
The guided setup needs a real terminal of at least 60x20. Pipes, CI, and small terminals fall back to the classic prompts automatically, and --quick forces them.
Service Auto-Resolution:
When you select services, required components are automatically added:
--services auth→ Auto-addsdatabasecomponent--services blog→ Auto-addsdatabasecomponent--services ai→ No additional components (backend always included)--services comms→ No additional components (backend always included)- Backend and frontend components are always included in every project
Component Dependencies:
Some components require others and will be auto-added:
worker→ Auto-addsredisscheduler[sqlite]→ Auto-addsdatabase
Examples with Auto-Resolution:
# Auth service auto-adds database
aegis init user-app --services auth
# Result: backend + frontend + database + auth service

# Worker auto-adds redis
aegis init task-app --components worker
# Result: backend + frontend + redis + worker

# Scheduler with SQLite auto-adds database
aegis init cron-app --components "scheduler[sqlite]"
# Result: backend + frontend + database + scheduler
aegis add
Add components to an existing Aegis Stack project. It also adds an installed
plugin: aegis add crawl4ai (see Plugins).
Usage:
Arguments:
COMPONENTS- Comma-separated list of components to add
Options:
--backend, -b TEXT- Scheduler backend: 'memory' (default) or 'sqlite' (enables persistence)--interactive, -i- Use interactive component selection--project-path, -p PATH- Path to the Aegis Stack project (default: current directory)--yes, -y- Skip confirmation prompt
Examples:
# Add scheduler with memory backend
aegis add scheduler

# Add scheduler with SQLite persistence
aegis add scheduler --backend sqlite
# or using bracket syntax
aegis add "scheduler[sqlite]"

# Add worker (auto-includes redis)
aegis add worker

# Add the htmx web frontend (server-rendered pages at /)
aegis add htmx

# Add multiple components
aegis add database,scheduler

# Add to specific project
aegis add scheduler --project-path ../my-project

# Interactive mode
aegis add --interactive
How It Works:
- Validates project was generated with Copier
- Checks component dependencies (auto-adds required components)
- Renders component templates with Jinja2
- Copies files to project (skips existing files)
- Updates
.copier-answers.ymlwith new configuration - Regenerates shared files (docker-compose.yml, pyproject.toml)
- Runs
uv syncto install new dependencies - Runs
make fixto format code
Notes:
- Components added incrementally without breaking existing code
- Shared files automatically regenerated with backups
- Changes are non-destructive (commit before running for easy rollback)
- Use
--verboseflag to see detailed operation logs
aegis add-service
Add services to an existing Aegis Stack project.
Usage:
Arguments:
SERVICES- Comma-separated list of services to add
Options:
--interactive, -i- Use interactive service selection--project-path, -p PATH- Path to the Aegis Stack project (default: current directory)--yes, -y- Skip confirmation prompt
Examples:
# Add auth service (auto-adds database if not present)
aegis add-service auth

# Add AI service
aegis add-service ai

# Add multiple services
aegis add-service auth,ai

# Interactive service selection
aegis add-service --interactive

# Non-interactive with auto-yes
aegis add-service auth --yes --project-path ../my-project
Service Auto-Resolution:
Services automatically add their required components if missing:
auth→ Requiresdatabasecomponent (auto-added if missing)ai→ Requiresbackendcomponent (always present)
Post-Addition Setup:
After adding services, follow these steps:
For Auth Service:
make migrate                       # Apply auth database migrations
my-project auth create-test-users  # Create test users for development
my-project auth list-users         # Verify users created
For AI Service:
Configure provider in .env:
AI_PROVIDER=public  # Options: public, openai, anthropic, google, groq, mistral, cohere

# For paid providers, add API key:
# OPENAI_API_KEY=sk-...
# ANTHROPIC_API_KEY=sk-ant-...
Test the AI service:
my-project ai status               # Check configuration
my-project ai chat                 # Start interactive chat
my-project ai providers            # See all available providers
Important Notes:
- Only works with Copier-generated projects (default since v0.2.0)
- Requires a git repository with a clean working tree: commit or stash first
- A failed add is undone: the project is reset to where it started, so the command can simply be run again
- Services require their dependencies - they will be auto-added
- Files your other services own are re-rendered when they branch on the one you add (for example, routers gain their auth guards when auth arrives); your own edits are kept through a three-way merge
- Review changes with
git diffbefore committing
See Generated Project CLI section below for full command reference.
aegis remove
Remove components from an existing Aegis Stack project. It also removes a
plugin: aegis remove crawl4ai takes out every file the plugin added, and
exports its tables before dropping them, so adding it back restores the data
(see Plugins).
Usage:
Arguments:
COMPONENTS- Comma-separated list of components to remove
Options:
--interactive, -i- Use interactive component selection--project-path, -p PATH- Path to the Aegis Stack project (default: current directory)--yes, -y- Skip confirmation prompt
Examples:
# Remove scheduler component
aegis remove scheduler

# Remove multiple components
aegis remove scheduler,worker

# Interactive mode
aegis remove --interactive
How It Works:
- Validates project was generated with Copier
- Checks component is currently enabled
- Deletes component files and directories
- Cleans up empty parent directories
- Updates
.copier-answers.ymlto disable component - Regenerates shared files (docker-compose.yml, pyproject.toml)
- Runs
uv syncto clean up unused dependencies - Runs
make fixto format code
Important Warnings:
- THIS OPERATION DELETES FILES - Commit your changes to git first
- Core components (backend, frontend) cannot be removed
- Removing scheduler with SQLite persistence leaves
data/scheduler.dbintact - Shared template files are regenerated (backups created automatically)
- Redis is auto-removed when worker is removed (no standalone functionality)
aegis remove-service
Remove services from an existing Aegis Stack project. The components a
service needed stay; remove them separately with aegis remove.
Usage:
Arguments:
SERVICES- Comma-separated list of services to remove
Options:
--interactive, -i- Use interactive service selection--project-path, -p PATH- Path to the Aegis Stack project (default: current directory)--yes, -y- Skip confirmation prompt--force, -f- Force through version mismatch warnings
Examples:
aegis remove-service auth
aegis remove-service auth,ai
aegis --verbose remove-service auth  # show each file operation
Important: this deletes files. Commit your changes to git first.
aegis update
Update an existing Copier-based project to the latest template version.
Usage:
Options:
--project-path PATH- Path to project to update (default: current directory)--to-version TEXT- Update to specific template version (default: latest)--force, -f- Accept all template changes automatically--yes, -y- Skip confirmation prompt--dry-run- Preview changes without applying them
Examples:
# Update current project to latest template
aegis update

# Update specific project
aegis update --project-path ../my-project

# Update to specific template version
aegis update --to-version 0.2.0

# Preview changes without applying
aegis update --dry-run

# Auto-accept all updates
aegis update --force --yes
How It Works:
- Validates project was generated with Copier
- Checks current template version from
.copier-answers.yml - Fetches latest template version (or specified version)
- Compares current files with template updates
- Shows diff of changes to be applied
- Prompts for conflict resolution
- Applies updates and creates backup files
- Runs
uv syncto update dependencies - Runs
make fixto format updated code
What Gets Updated:
- ✅ Template infrastructure files
- ✅ Shared files (docker-compose.yml, pyproject.toml, Makefile)
- ✅ Component implementations (if unmodified)
- ✅ Test infrastructure
- ✅ Documentation templates
What's Preserved:
- ✅ Your custom business logic
- ✅ Your environment variables (.env)
- ✅ Your database migrations
- ✅ Your custom models and services
- ✅ Files you've modified (marked as conflicts)
Important Notes:
- Always commit before updating:
git add . && git commit -m "Pre-update checkpoint" - Test after updating: Run
make checkto verify everything works - Use
--dry-runfirst to preview changes - Conflicts need a real merge, not a side. A
<<<<<<<block only appears where you and the template changed the same region, so both changes usually have to survive.<<<<<<< your projectis your code,>>>>>>> new templateis the incoming template; keep both where they don't contradict, then delete the marker lines and runaegis update --finish. --template-pathpins the project to that checkout. It rewrites_src_pathin.copier-answers.ymlto a path on your machine, which no teammate, container, or CI job has. Set it back togh:lbedner/aegis-stackbefore committing.
Deployment Commands
Commands for deploying your project to a remote server. See the Deployment Guide for full workflows and examples.
aegis deploy-init
Initialize deployment configuration for a project.
Usage:
Options:
--host, -h TEXT, Server IP address or hostname--user, -u TEXT, SSH user for deployment (default:root)--path, -p TEXT, Deployment path on server (default:/opt/{project-name})--project-path TEXT, Path to the project (default: current directory)
Examples:
aegis deploy-setup
Provision a remote server for deployment. Installs Docker, configures firewall, and prepares the server.
Usage:
Options:
--project-path TEXT, Path to the project (default: current directory)
Examples:
aegis deploy-provision
Experimental Feature
deploy-provision and deploy-destroy have run end to end against a live Hetzner account with an sslip.io name (server, HTTPS certificate, deploy, destroy). The --domain path through Cloudflare and the whole --provider digitalocean path are tested only against a mocked API. Expect rough edges, and check your provider's console after a failed run.
Create a server in your own Hetzner Cloud or DigitalOcean account and deploy to it. Shows the
monthly price and asks before creating anything. The server boots with the
project's scripts/server-setup.sh as cloud-init user-data, so it arrives with
Docker and the firewall ready. Provisioning then waits for SSH and cloud-init,
points a name at the server, waits for that name to resolve (so the first
Let's Encrypt request does not fail), turns HTTPS on for that name (the same
change aegis ingress-enable makes, so a project generated without TLS gets
it), writes .aegis/deploy.yml and runs aegis deploy.
Let's Encrypt needs an email address: --email, or the one TLS was turned
on with, or the project's author_email when it is not the generated
placeholder. Without one the command stops before creating anything. The
address is kept in .aegis/deploy.yml (git-ignored), never in a committed
file: each deploy stamps it into the server's .env as ACME_EMAIL, and the
production Traefik fills its config in from that when it starts.
Tokens are read from the environment at call time and never stored or printed (at most the last four characters are shown):
HCLOUD_TOKEN(--provider hetzner), a Hetzner Cloud API token with read/write access. It can create and delete every server in its project, so use a project dedicated to this app.DIGITALOCEAN_TOKEN(--provider digitalocean), a DigitalOcean API token with write scope.- Only with
--domain, the DNS provider's keys (--dnsnames one; by default the first whose keys are set):CLOUDFLARE_API_TOKEN: a token with DNS edit rights on the zone that owns the name.PORKBUN_API_KEYandPORKBUN_SECRET_KEY, with API ACCESS on for the domain (its details page on porkbun.com).
Without --domain the app gets an sslip.io name (203-0-113-7.sslip.io),
so a first deploy needs no domain at all.
On DigitalOcean the droplet also gets a cloud firewall allowing only SSH, HTTP and HTTPS in: Docker-published ports bypass the server's own ufw, so the firewall outside the droplet is the one that holds. It is deleted with the droplet.
A project whose docker-compose.prod.yml takes its host from ${DOMAIN} is
left as it is: each deploy stamps into the server's .env, beside
BUILD_ID, what provisioning recorded in .aegis/deploy.yml: the server's
name as DOMAIN, the certificate's address as ACME_EMAIL, and --allowlist
as ADMIN_IP_ALLOWLIST. Any other project has HTTPS rendered into its
files for the name, as aegis ingress-enable does.
Every resource is recorded under provision: in .aegis/deploy.yml the moment
it exists. If a later step fails, the command lists what was created and offers
to delete it; run it again to resume instead.
Usage:
Options:
--provider TEXT, Cloud provider:hetzner(default) ordigitalocean--size TEXT, Server type (default:cx23on Hetzner,s-1vcpu-2gbon DigitalOcean)--region TEXT, Provider location (default:nbg1on Hetzner,tor1on DigitalOcean)--domain TEXT, Hostname to point at the server through its DNS provider--dns TEXT, DNS provider for--domain:porkbunorcloudflare(default: the first whose keys are set)--email TEXT, Address Let's Encrypt registers the certificate to (default: the project'sauthor_email)--allowlist TEXT, Networks that may reach the Overseer and admin paths, comma-separated (e.g.203.0.113.9/32)--ssh-key TEXT, Public key installed for root (default: the first of~/.ssh/id_ed25519.pub,id_ecdsa.pub,id_rsa.pubthat exists)--project-path TEXT, Path to the project (default: current directory)--yes, -y, Skip the price confirmation
Examples:
aegis deploy-provision
aegis deploy-provision --size cx33 --region fsn1
aegis deploy-provision --provider digitalocean --region fra1
aegis deploy-provision --domain app.example.com
aegis deploy-provision --domain app.example.com --dns porkbun
aegis deploy-destroy
Delete the provisioned server, its DNS record, its cloud firewall and the SSH
key provisioning uploaded, then mark the record in .aegis/deploy.yml destroyed. Asks you to
type the server name to confirm, or takes it as --confirm.
Usage:
Options:
--confirm TEXT, The server name, typed in advance: skips the prompt, and must still match--project-path TEXT, Path to the project (default: current directory)
aegis deploy-cd-setup
Wire up GitHub Actions continuous deployment. Generates a dedicated ed25519
deploy key, installs its public half on the server, pushes the private key,
host and user to GitHub Actions secrets, and scaffolds
.github/workflows/deploy.yml. Needs the GitHub CLI (gh auth login) and an
.aegis/deploy.yml from aegis deploy-init.
Usage:
Options:
--repo TEXT, GitHub repo asowner/name(default: detected from theoriginremote)--on-tag, Also deploy on pushes ofv*tags--force, Overwrite existing GitHub secrets and the workflow (rotates the key)--dry-run, Print the planned actions without changing anything--keep-key TEXT, Copy the generated private key here before cleanup (default: it only lives in GitHub secrets)--project-path TEXT, Path to the project (default: current directory)
Examples:
aegis deploy-cd-setup
aegis deploy-cd-setup --on-tag
aegis deploy-cd-setup --force  # rotate the deploy key
aegis deploy-agent
Run what Overseer > Deployments asks for on this machine: a provider's sizes
and regions, what the account already runs, the stack's footprint, a new server, a deploy, a backup, the backup list, a rollback, a destroy. The
Overseer puts each request on the project's Redis; this takes them one at a
time and runs the matching aegis deploy-* command, streaming its output back
to the page. make serve runs it as the dev stack's deploy-agent service;
run it by hand in the project directory with the stack up, where your SSH key
is. A cloud token comes with the request that needs it (set on
Overseer > Secrets, or in the app's .env), or from this machine's
environment; a sent one wins. It reaches the command only through the
environment, is masked in the output, and is kept nowhere (the heartbeat
names the providers this machine holds a token for, never the token). A new
server on a domain, and its destroy, carry the DNS provider's keys the same
way; only a DNS provider's own variables are accepted (anything else, such as
PATH, is refused).
It finds Redis with REDIS_URL_LOCAL, else by asking Docker, on every
(re)connect, for the port of the redis container compose started from this
checkout; never .env.ports, whose port may since be another project's. It
refuses to listen while another live agent does for the project, and stops
once whoever started it (a shell) is gone; stopped (SIGTERM, as compose stops
the service), it finishes what it took and takes its heartbeat down, so the
next one listens at once. When its own code changes (an editable install, as
the service's AEGIS_STACK_SOURCE), it restarts on it once nothing it took is
running. Requests older than five
minutes are failed, not run. A new server is created only at the price you
typed back in the Overseer, which it asks the provider for again first.
The heartbeat also names the actions this agent runs and the protocol
revision it speaks: one started before the CLI learned what the page asks
for is shown as older than the app and is not asked.
Usage:
Options:
--project-path TEXT, Path to the project (default: current directory)
aegis deploy
Deploy the project to the configured server. Creates a backup, syncs files, builds Docker images, starts services, and runs a health check (through HTTPS for the app's name when TLS is on). Auto-rollback on failure. With the deploy component and a database, it then records the deploy in the app's deploy history: who deployed, from where, the health result, the backup and any rollback.
Usage:
Options:
--build / --no-build, Build images before deploying (default:--build)--backup / --no-backup, Create backup before deploying (default:--backup)--health-check / --no-health-check, Run health check after deploying (default:--health-check)--project-path TEXT, Path to the project (default: current directory)
Examples:
aegis deploy-backup
Create a backup of the currently deployed application on the remote server.
Usage:
Options:
--project-path TEXT, Path to the project (default: current directory)
Examples:
aegis deploy-backups
List available deployment backups with timestamps, sizes, and database dump status.
Usage:
Options:
--project-path TEXT, Path to the project (default: current directory)
Examples:
aegis deploy-rollback
Rollback to a previous deployment backup. Uses the latest backup if none specified.
Usage:
Options:
--backup, -b TEXT, Backup timestamp to rollback to (default: latest)--project-path TEXT, Path to the project (default: current directory)
Examples:
aegis deploy-logs
View logs from the deployed application.
Usage:
Options:
--follow / --no-follow, -f, Follow log output (default:--follow)--service, -s TEXT, Show logs for a specific service--project-path TEXT, Path to the project (default: current directory)
Examples:
aegis deploy-status
Check the status of deployed services.
Usage:
Options:
--project-path TEXT, Path to the project (default: current directory)
Examples:
aegis deploy-stop
Stop all deployed services.
Usage:
Options:
--project-path TEXT, Path to the project (default: current directory)
Examples:
aegis deploy-restart
Restart all deployed services.
Usage:
Options:
--project-path TEXT, Path to the project (default: current directory)
Examples:
aegis deploy-shell
Open a shell in a deployed container.
Usage:
Options:
--service, -s TEXT, Service to connect to (default:webserver)--project-path TEXT, Path to the project (default: current directory)
Examples:
aegis deploy-exec
Run a one-off command in a deployed container, non-interactively. The
scriptable sibling of deploy-shell: it streams output and exits with the
command's own status, so it works under set -e and in CI. Put -- before
the command so its flags are not read as this CLI's.
Usage:
Options:
--service, -s TEXT, Service to run in (default:webserver)--project-path TEXT, Path to the project (default: current directory)
Examples:
aegis ingress-enable
Enable TLS (HTTPS) on a project with the ingress component. Configures Let's Encrypt certificates via Traefik.
Usage:
Options:
--domain, -d TEXT, Domain name for TLS certificate (e.g.,example.com)--email, -e TEXT, Email for Let's Encrypt certificate notifications--project-path, -p TEXT, Path to the project (default: current directory)--yes, -y, Skip confirmation prompts
Examples:
aegis ingress-enable --domain example.com --email admin@example.com
aegis ingress-enable -d example.com -e admin@example.com -y
aegis ingress-enable  # interactive prompts
Plugin Commands
Plugins are Python packages that add a capability to a project; see
Plugins. Install the package with pip or uv, then add
it with aegis add <name>.
aegis plugins list
Installed plugins, and whether each can be added to the project.
Options:
--project-path, -p PATH- Project to check against (default: the current directory, if it is one)--verbose, -v- Show a description column
aegis plugins info
One plugin in detail: its options, dependencies, files, migrations, the CLI it adds, and what adding it would change in this project.
aegis plugins search
Search the plugin directory at aegis-stack.io/plugins. Marks what is already installed and prints the install steps for the rest.
aegis plugins update
Re-render a plugin's files after upgrading its package.
Options:
--all- Update every plugin in the project--project-path, -p PATH- Path to the project (default: current directory)--yes, -y- Skip confirmation prompts--force, -f- Apply the update even when the new plugin version does not declare support for this aegis-stack version
aegis plugins create
Scaffold a new aegis-stack-<name> package. See
Creating a Plugin.
Options:
--target-dir, -d PATH- Where to create it (default: current directory)--author TEXT- Author forpyproject.tomland the README--description TEXT- One-line description--yes, -y- Skip the confirmation prompt
Generated Project CLI
When you add services to a project, they install their own CLI commands as entry point scripts. These commands are available after running uv sync in your generated project.
Script Installation:
All generated projects get a CLI script matching the project name:
Component CLIs
Components that add CLI capabilities to your generated projects:
Scheduler - my-app tasks
Manage scheduled tasks with persistent job tracking:
my-app tasks list       # List all scheduled jobs
my-app tasks stats      # View scheduler statistics
my-app tasks history    # View execution history
→ Complete Scheduler CLI Reference
Worker - Backend-specific CLI
Background task processing with Redis-backed queues. Commands depend on your selected backend:
arq (default):
arq my_project.components.worker.queues.system.WorkerSettings   # Start worker
arq --watch my_project.components.worker.queues.system.WorkerSettings  # Auto-reload
Dramatiq:
dramatiq app.components.worker.broker \
  app.components.worker.queues.system \
  app.components.worker.queues.load_test \
  --queues system load_test
TaskIQ:
→ Complete Worker CLI Reference
Service CLIs
Services that add CLI capabilities to your generated projects:
Auth Service - my-app auth
User management and testing utilities:
my-app auth create-test-user   # Create single test user
my-app auth create-test-users  # Create multiple test users
my-app auth list-users         # List all users
AI Service - my-app ai
Multi-provider AI chat interface with conversation management:
my-app ai status               # Show configuration and validation
my-app ai providers            # List all 7 AI providers
my-app ai chat "Hello"         # Send single message
my-app ai chat                 # Interactive chat session
my-app ai conversations        # List user conversations
my-app ai history <id>         # View conversation history
Blog Service - my-app blog
Inspect posts and tags, transition post state, and manage taxonomy:
my-app blog status                       # Counts and latest activity
my-app blog posts --status draft         # List posts (filter by status/tag)
my-app blog post <slug>                  # Show one post's metadata
my-app blog publish <slug>               # Draft/archived to published
my-app blog archive <slug>               # Hide from the public site
my-app blog delete <slug> --yes          # Permanent delete
my-app blog tags                         # List tags
my-app blog tag-create "Release Notes"   # Create a tag
Project Structure
Projects created with aegis init follow this structure:
my-project/
├── app/
│   ├── components/
│   │   ├── backend/        # FastAPI backend
│   │   ├── frontend/       # Flet frontend
│   │   ├── web_frontend/   # htmx web frontend (if included)
│   │   ├── scheduler.py    # APScheduler (if included)
│   │   ├── worker/         # Worker queues (if included)
│   │   └── database.py     # Database setup (if included)
│   ├── core/              # Framework utilities
│   ├── services/          # Business logic
│   ├── cli/               # CLI commands (if services added)
│   └── integrations/      # App composition
├── traefik/               # Traefik config (if ingress included)
│   └── traefik.yml        # Traefik static configuration
├── scripts/               # Deployment scripts (if ingress included)
│   └── server-setup.sh    # Server provisioning
├── tests/                 # Test suite
├── docs/                  # Documentation
├── data/                  # SQLite databases (if database included)
├── pyproject.toml         # Project configuration
├── Dockerfile             # Container definition
├── docker-compose.yml     # Multi-service orchestration
├── Makefile              # Development commands
└── .env.example          # Environment template
Development Workflow
After creating a project:
cd my-project
uv sync                    # Install dependencies and create virtual environment
source .venv/bin/activate  # Activate virtual environment (important!)
cp .env.example .env       # Configure environment (edit API keys, etc.)
make serve                 # Start development server
make test                  # Run test suite
make check                 # Run all quality checks (lint + typecheck + test)
make check-queries         # Detect N+1 queries in the suite (database stacks)
Evolving Your Project
# Add components as you need them
aegis add scheduler
aegis add worker

# Add services for new features
aegis add-service auth
aegis add-service ai

# Remove components you don't need
aegis remove scheduler

# Update to latest template version
aegis update

# Always commit before making changes
git add . && git commit -m "Add scheduler component"
Best Practices
- Commit before evolving: Always commit your work before adding/removing components
- Use verbose mode: Add
--verboseflag to see detailed operations - Test after changes: Run
make checkafter adding/removing components - Review diffs: Use
git diffto see what changed after operations - Update regularly: Keep your project in sync with latest template via
aegis update
Environment
The CLI respects these environment variables:
- Standard Python environment variables
- UV environment variables (for dependency management)
- Project-specific variables (when running generated CLI commands)